If you see this error message when attempting to open a company file:
There is likely an update for QuickBooks. Close and re-open QuickBooks. Check for and install all updates.
Author: James Bye Last update: 2024-11-26 05:32
This action requires Windows administrator permissions
If a user receives the following error saying "This action requires administrator permissions"
This is because the user is not an admin over the PC running QuickBooks and there is a required update.
Close QuickBooks
Log out of the current user
Log in as a local administrator
Open QuickBooks
Download and install all available updates
Reboot
Author: James Bye Last update: 2024-11-26 05:35
Move data from QuickBooks Online to QuickBooks Desktop
Transfer all your data and transactions from QuickBooks Online to QuickBooks Desktop with the help of the migration tool. Learn how to download and use it here.
Select Download tool. Note: Keep this page open on your browser.
Install the migration tool, then select Next.
Read and accept the terms in the license agreement, then select Next.
Select Install, then select Finish.
Step 2: Export your QuickBooks Online data
In the Step 1:Prepare to export page, select Continue.
Select the QuickBooks Online data you want to export, then select Continue. Note: You can either choose All financial data or All financial data without transactions. For products and services, quantity on hand isn't exported.
In the Step 3: Request your data page, select Continue.
Fill in the Name and Email address fields, then select Continue.
Select Close. Note: Email confirmation may take time depending on the amount of data to migrate. Check your QuickBooks Online home page for updates.
Note: You have 90 days from the time you create your QuickBooks Online account to move your data. If you’re not sure how old your company is, sign in to QuickBooks Online. Then, refresh this page for personalized info.
Explore the benefits of moving to QuickBooks Online including automatic updates for the latest version of QuickBooks, tracking and sending invoices on the go and mobile alerts. Learn more about QuickBooks Online.
To watch more how-to videos, visit our video section.
Mark any customers, vendors or accounts you don't use as inactive. This'll clean up the data you moved to QuickBooks Online.
Delete or void, unbilled charges and unbilled time associated with inactive accounts, customers, vendors or employees. To delete unbilled charges, Go to Vendors then select Bills.
Each transaction in your file has links or targets to every other entry related to it. For example, an invoice has a target for the customer and each item, account, estimate, sales tax, and payment it touches.
Total targets need to be less than 1,500,000 for data to move to QuickBooks Online. Press Ctrl+1 or F2 on your keyboard to check. If you’re over 1,500,000 targets, you can try to condense your data. You can also enter your customer opening balances in a new QuickBooks Online file.
Make sure Employee profile info (first, last name, SSN, date of birth, hire date and address) are available and updated for all employees.
Wait 2–3 days after you've run payroll to move your data. This helps make all your paycheck info transfer over to QuickBooks Online. Then, move your data before your next payroll. NOTE: Make sure to move your data at least a few days before your next payroll run. This'll give you time to finish the setup for Online Payroll.
If you use QuickBooks Desktop Payments:
To move your QuickBooks Payments subscription to Online, your QuickBooks Online account admin email needs admin-level permissions on your QuickBooks Desktop Intuit account
If you use QuickBooks Time, contact us for help setting up your account in QuickBooks Online.
You have two options to move your data.
Important! If your QuickBooks Desktop version is 2021 or older or you don’t have access to QuickBooks Desktop, you'll have to use the web-based migration tool.
Sign in as an admin in QuickBooks Desktop.
Export your QuickBooks Desktop company
In QuickBooks Desktop Pro and Premier, go to Company, then select Export Your Company File to QuickBooks Online.
In QuickBooks Desktop Enterprise, press CTR + 1 to open the Product information window. Then press CTRL + B + Q then select OK.
Select Get started.
You’lll see the “Let’s bring your data to QuickBooks Online” screen. Select how you want to move your data:
Bring all of your company data.
Bring only lists and balances. (This is helpful if you have a large file and don’t want to bring over every individual transaction.)
If you have inventory, you can:
Select Yes, track inventory using FIFO then select a starting date.
If you use multi-currency in QuickBooks Desktop, you’ll have to select a home currency.
You will be asked if you have a QuickBooks Online account.
If you do, select Yes, sign me in then select Continue. Note: This is the account you created when you purchased QuickBooks Online in Step 1.
If you haven't signed up for QuickBooks Online, you can select No, I need to create one. This'll create a QuickBooks Online Advanced trial company. We recommend you go to QuickBooks.Intuit.com/accounting to buy the right QuickBooks Online offering for your company before you move your data.
Sign in with your user ID and password you set up for your QuickBooks Online subscription.
You’ll see your QuickBooks Online company names and subscriptions listed. Select the company you want to move your data to.
Select Continue, then select Export. You'll see a progression bar as your data is moved over to QuickBooks Online. Note: If you already have data in a QuickBooks Online account, QuickBooks will ask if you want to replace the existing data.
Select Agree, then Replace.
Select Yes, go ahead and replace the data, then select Replace.
Convert your QuickBooks for Mac file to QuickBooks for Windows before you use the tool.
Select Get Started, then sign in with your Intuit Account.
Upload your company file.
Select File then browse to the QuickBooks Desktop file you want to move. Note: You can only upload one file at a time.
Select Open to upload the file.
You can drag and drop your QuickBooks Desktop file to upload it.
Once your file is uploaded, we’ll auto-update it to the latest version of QuickBooks Desktop.
Next, you'll see an option to move to QuickBooks Online.
Follow the on-screen instructions to guide you through the move to QuickBooks Online.
Schedule a 1 hour call with one of our experts. We'll answer questions about your data move, show you around QuickBooks Online, and help you tackle everyday tasks.*
If you use payroll, follow this guide to set up and run your payroll in QuickBooks Online. Note: To view this, you'll need to sign in to QuickBooks Online.
Example: The path for Outlook 2016 would be: HKEY_CURRENT_USER\Software\Policies\Microsoft\Office\16.0\Outlook\PST
3. Create New DWORD Values
Right-click on the blank space in the right window and select New > DWORD (32-bit) value.
Figure 5: Create-DWORD-File
4. Enter Registry Name
Give the name to the registry as ‘MaxLargeFileSize’.
Figure 6: MaxLargeFileSize-Registry-Name
5. Add the File Size Limit
For this, right-click the DWORD value and choose Modify. Now, select the Decimal radio button under the Base option. Enter the value in MB in the Value Data section. Click on OK.
Figure 7: MaxLargeFileSize-Edit-DWORD-Value
Similarly, create DWORD value of WarnLargeFileSize.
Figure 8: WarnLargeFileSize-Registry-Name
Enter a value into it. Usually, 95% is the recommended size of the set mailbox file size limit.
Figure 9: WarnLargeFileSize-Edit-DWORD-Value
Reducing the Mailbox and PST File Size Limit
If the PST file has reached its maximum limit, you can reduce the PST file size to avoid issues with your Outlook. Follow the steps mentioned below:
Open Outlook. Go to the File menu and then navigate to Info > Tools > Mailbox Cleanup.
Figure 10: Mailbox-Cleanup-Menu
You will see many options in the new window, like View mailbox size, Find items older than, Find items larger than, Auto Archive, empty, etc. Using these options, you can remove unwanted emails and reduce the PST file size.
Figure 11: Mailbox-Cleanup-Dialog-Box
Compact the Outlook PST File Size
Follow the steps given below to compact the PST file size:
Choose the File option. Then, click on Account Settings > Account Settings.
Figure 12: Account-Settings-Menu
Go to the Data Files tab. Choose the file that you have to compact. Further, click on Settings.
Figure 13: PST-Data-Files-List
In the Outlook Data File dialog box that opens, click on Compact Now button.
Figure 14: Outlook-Data-File-Compact-Now
Easy Solution to Reduce PST File Size Limit
The manual method to reduce PST file size requires technical expertise and is time-consuming. Alternatively, you can use a dedicated tool that can make such tasks much easier. The best tool you can choose is Stellar Toolkit for Outlook. It is an 8-in-1 software package, with advanced utilities to split Outlook PST files, compact Outlook PST, remove duplicate emails, etc. You can install Stellar Toolkit for Outlook and explore the features of this amazing software.
On the Restricted entities page, identify the user account to unblock. The Entity value is Mailbox.
Select a column header to sort by that column.
To change the list of entities from normal to compact spacing, select Change list spacing to compact or normal, and then select Compact list.
Use the Search box and a corresponding value to find specific users.
Select the user to unblock by selecting the check box for the entity, and then selecting the Unblock action that appears on the page.
In the Unblock user flyout that opens, read the details about the restricted account on the Overview page. Verify that you've gone through the suggestions in the Recommendations section to confirm that the account isn't compromised or to regain control of the account.
When you're finished on the Overview page, select Next.
On the Unblock user page, consider the recommendations and use the links in the Multi-factor authentication and Change password sections to Enable MFA and Reset the user's password if you haven't done these steps already. Enabling MFA and resetting the password are a good defense against future account compromise.
When you're finished on the Unblock user page, select Submit.
Select Yes in the warning dialog that opens.
Alternatively, you can use the following PowerShell command when logged in to ExchangeOnline via a PS Session. To remove a user from the Restricted users list, replace <emailaddress> with their email address and run the following command:
When you first signed up for Microsoft 365, you created an onmicrosoft.com domain. Even if you later added a custom domain, the original onmicrosoft.com domain is used for all your SharePoint and OneDrive URLs.
If your organization is going through a rebranding, merger, or acquisition and needs to change the domain in your SharePoint and OneDrive URLs, you can change the domain name using PowerShell. For example, if your organization name changed from Contoso to Fabrikam, you can change your SharePoint URLs from contoso.sharepoint.com to fabrikam.sharepoint.com.
Step 1: How do I add the new domain name?
Check the availability of the new domain you want. For example, if you want your SharePoint and OneDrive URLs to begin with fabrikam.sharepoint.com, enter https://fabrikam.sharepoint.com in a browser. If you get a message that the address couldn’t be found (404), it's probably available. If you get a sign-in screen or a message that your username couldn’t be found in the fabrikam.sharepoint.com directory, then the domain is taken and you need to try a different one. If the domain is already registered by another customer, we can't provide any information or contact the customer.
-or-
If you own the domain for another subscription, you need to delete that tenant in Microsoft Entra ID. Deleting a tenant typically takes three days to complete and to make the domain available.
Warning
Do NOT use the domain to test this procedure in a test environment first. If you do, you won't be able to use the domain for your production environment.
Don't use the "Add domain" option directly present in the Domains page, since that doesn't create a .onmicrosoft.com domain. Use the steps in the link above to correctly create one.
Don't make this domain your fallback domain.
Go back to the Domains page and check that the newly added .onmicrosoft.com domain appears in a 'Healthy' state.
Step 2: Use Microsoft PowerShell to rename your domain
Warning
When the change of the SharePoint domain starts, sites that remain on the original domain are temporarily inaccessible. As each site gets renamed to the new domain, it becomes accessible again.
Changing your SharePoint domain name might take several hours to days depending on the number of sites and OneDrive users that you have. We strongly recommend that you make this change during a period of low usage (like a weekend) and tell users to avoid accessing SharePoint and OneDrive content during the change. In addition, any actions that create new OneDrives and sites (such as creating a new team or private channel in Microsoft Teams) are temporarily blocked during the rename.
Don't plan any UPN changes or renames while the change of your SharePoint domain name is in progress. If you need to perform any, please do so after the domain name change is complete.
REQUIRED - Download the latest SharePoint Online Management Shell. If you installed a previous version of the SharePoint Online Management Shell, go to Add or remove programs and uninstall "SharePoint Online Management Shell". Make sure you review the System Requirements and Install Instructions. The app isn't supported on Mac.
Where "DomainName" is the part before "sharepoint.com" or "onmicrosoft.com" and "ScheduledDateTime" is at least 24 hours in the future, but not more than 30 days. The time you enter is based on the current date and time of the computer you're using.
If the PowerShell command Start-SPOTenantRename isn't found or nothing is returned, make sure you installed the latest SharePoint Online Management Shell. Before installing the latest version, you might need to uninstall all previous versions by running Uninstall-Module Microsoft.Online.SharePoint.PowerShell -Force -AllVersions. For more info about the Start-SPOTenantRename cmdlet, see Start-SPOTenantRename
If you had purchased SharePoint Advanced Management licenses for all users at the time of scheduling your rename, it would be automatically considered an Advanced Tenant Rename, with the ability to prioritize sites.
You can prioritize individual sites using the Set-SPOTenantRenameSitePrioritization cmdlet. For example, to prioritize a site ‘projectx’, you should run the following command:
If you have already identified the list of sites you’d want prioritized and want to perform the Set operation in bulk, you can populate them in a CSV file and then use PowerShell to import it and iteratively execute the cmdlets. The file should just have a single column with title as ‘SiteUrl’, and every subsequent row should be the full URL of the desired site.
If you attempt this with a file that has the entire 4,000 sites in it, the complete execution of this cmdlet can take approximately 4-6 hours. If you want shorter waiting times, we recommend splitting your list of sites up and performing this in batches.
To view the list of sites prioritized currently, run the following command:
Get-SPOTenantRenameSitePrioritization
And if you want to remove prioritization for a site, you can run the Remove-SPOTenantRenameSitePrioritization cmdlet. For example, to remove prioritization for the ‘projectx’ site, you should run the following command:
Prioritizing a site isn't a guarantee that it will be completed first. There are several factors that can affect processing times, and multiple site renames are processed in parallel. Prioritized sites have a higher chance of completing first.
Step 4: Monitor the status of the rename
You can get the status of the rename by running Get-SPOTenantRenameStatus. Make sure you open a new PowerShell window to sign in again. The date and time shown with this command is in UTC time (but follows the local format of the system where the cmdlet is run). More info about Get-SPOTenantRenameStatus During and after the rename, you can get the state of a site by running Get-SPOSiteRenameState. For more info about this cmdlet, see Get-SPOSiteRenameState.
To verify success of the rename operation, review the status of the rename operation, and the count of renamed sites in comparison to total sites. The count of sites that can't be renamed to the new domain is shown in the Attention Required field. To get more information on these sites, run Get-SPOSiteRenameState and pass the RenameJobID listed in the tenant rename status as the ParentOperationID, and the desired status (Success/Failed/Suspended). If you want to export these results to a CSV file, you can use the Export-Csv cmdlet.
Step 5: Review features and settings after the rename
Review any firewall rules that might block access to the new domain.
Review organization browser settings to make sure the new domain is a trusted location. This includes reviewing any Group Policy settings that might control browser settings.
Review any third-party apps, custom apps, and scripts that access SharePoint. They might need to be modified to use the new domain.
If you have custom SharePoint Framework solutions that require access to an API, check the API access page in the SharePoint admin center to ensure that the new domain name can be used by SharePoint Framework components
Tenant renaming is in progress. You can't trigger a tenant rename process while another rename process is running.
Wait for the current process to finish.
756
An unexpected error occurred while trying to update the tenant URLs.
An unexpected run-time error occurred when you started the tenant renaming job.
Retry the rename action after some time passes.
757
The domain name isn't valid.
The domain name isn't in the list of verified domains for the tenant.
Add a verified domain, and start a rename action by using the domain.
758
The domain name isn't valid.
The domain name could be null (empty), is longer than 48 characters, or contains a hyphen or other special characters.
The domain name that you're trying to use isn't in a valid format. The -DomainName parameter should be only the name portion of the domain. For example, if the domain is fabrikam.onmicrosoft.com, the parameter would be only fabrikam.
759
SharePoint Online Tenant Rename isn't supported for your tenant.
The tenant has a Microsoft Business Productivity Online Suite (BPOS) site for which renaming isn't supported. These sites were created several years ago when SharePoint Online was named Business Productivity Office Suite (BPOS).
Both the source and target sites are created by using redirect templates that aren't supported for renaming. The template of the target site isn't in the allowed templates (redirect site).
Remove target sites that have a redirect template, and then try the rename action again.
763
There are no sites to rename.
There are no sites to be renamed.
The tenant has no sites to be renamed.
768
SPO Tenant Rename can't be restarted because the current state is {0}.
The tenant rename job is either suspended, queued, or in progress.
Wait for the tenant rename job to finish.
769
The domain name can't be the same as the current name.
Original and target domain are the same.
Use a target domain name that's different from the original domain name.
770
SPO Tenant Rename is currently blocked.
Tenant renaming is blocked because the server is busy.
Retry the rename action after some time passes.
771 1090 1091 1092
SPO Tenant Rename is currently blocked.
Tenant renaming is blocked because the tenant is currently being moved.
Retry the rename action after some time passes.
772
Scheduled date/time must be 24 hours in the future.
The scheduled time is less than 24 hours from the current time.
Provide a schedule time that's equal to or greater than 24 hours from the current time, and then start the rename action.
773
Not Implemented.
Tenant renaming isn't enabled for the customer.
Tenant renaming isn't enabled yet for this customer. Wait for this feature to be implemented for your tenant.
775
The scheduled date/time must be within 30 days.
The scheduled time is greater than 30 days from the current time.
Provide a schedule date/time value that's 30 days or fewer from the current day, and then start the rename action.
776
SPO Tenant Rename isn't supported for Multi-Geo tenants.
Multi-Geo tenants aren't supported.
Tenant renaming currently can't be scheduled for tenants that have, or previously had, Multi-Geo status configured.
777
SPO Tenant Rename isn't supported for your tenant.
The tenant has a public site. Therefore, the tenant rename action is canceled.
The public site on the tenant has to be removed before you can try to schedule tenant renaming. Submit a support request by selecting Rename a SharePoint Tenant with Public site
779
Cannot schedule due to system maintenance.
Tenant renaming can't be scheduled because of maintenance events.
Retry the renaming action after some time passes.
780
Cannot perform a rename as you exceed the maximum number of allowed Sites and OneDrive.
There are too many sites in the tenant.
The tenant has more sites than is currently allowed.
781
Canceled by the system due to system maintenance.
Tenant renaming is canceled because a maintenance event is occurring.
Retry the rename action after some time passes.
783
Your organization has already reached the allowed number of SPO tenant renames.
The tenant can be renamed only one time, and your organization has already been renamed.
The specified site does not exist. Please check the URL and try again.
The specified site doesn't exist.
Check whether the site exists, or whether there are any typos in the URL.
-15
This site URL is invalid. Please double-check your site URL.
The specified URL has an invalid format.
Check the format of the specified URL.
1095
The rename cannot be scheduled currently since alternate URLs exist in the tenant.
The tenant has alternative URLs configured for which renames aren't supported. These URLs are probably held over from earlier SharePoint on-premises implementations.
Renames to older domains are not supported. Please try again with a different domain.
Renaming to a domain name that was used previously is not supported.
Use a new domain name.
Note: You might encounter different errors about individual site renaming if the actions fail as part of the domain rename process. For more information, see Errors when you rename a SharePoint site address.
Note for tenant renames for more-than-100K sites: The Start-SPOTenantRename cmdlet might time out and return the following message:
It looks like the command has timed out. Please do not retry at this time. Continue monitoring the status using Get-SPOTenantRenameStatus."
In this situation, avoid retrying Start-SPOTenantRename. You can continue to check the status of the process by using Get-SPOTenantRenameStatus. Details of the rename action are available in this cmdlet output after the scheduled action finishes. If the status doesn't update after two hours, or if you observe unexpected behavior, contact Microsoft Support for assistance.
Find the Application User Model ID (AUMID) of an installed app
To get the names and AUMIDs for all apps that appear in the Start menu, open a Windows PowerShell command prompt and enter the following command:
Get-StartApps
Note: Applications that are not listed in the Start menu will not appear in the output of the Get-StartApps cmdlet.
To get the names and AUMIDs for Microsoft Store apps installed for the current user, open a Windows PowerShell command prompt and enter the following commands:
Note: You can add the -user <username> or the -allusers parameters to the Get-AppxPackage cmdlet to list AUMIDs for other users. You must use an elevated Windows PowerShell prompt to use the -user or -allusers parameters.
To get the AUMID of any application in the Start Menu, use the following code to create a function in Windows PowerShell that returns the AUMID of any application currently listed in the Start menu.
After creating the function, run the following command to the AUMID of any application currently listed in the Start menu.
Get-AppAUMID
Author: James Bye Last update: 2024-09-24 05:50
Configure the applications pinned to the taskbar
Before you begin
Here are some considerations before you start configuring the taskbar pinned applications:
There's no limit to the number of apps that you can pin
In the XML file, add apps using the Application User Model ID (AUMID), the Desktop Application ID, or the Desktop Application Link Path
Some classic Windows applications are packaged differently than they were in previous versions of Windows, including Notepad and File Explorer. Make sure to enter the correct Application ID. To learn more, see Find the Application User Model ID of an installed app
If you specify an app to be pinned that isn't provisioned for the user on the device, the pinned icon doesn't appear on the taskbar
The order of applications in the XML file dictates the order of pinned apps on the taskbar, from left to right. If the OS is configured to use a right-to-left language, then the taskbar order is reversed
Applications can be pinned using the following methods:
Default Windows apps, pinned during the OS installation. For example: Microsoft Edge, File Explorer, and Store. These applications are pinned first (blue square)
Pinned manually by the user. These applications are usually pinned next to the default pinned apps (red circle)
Pinned via policy settings. These applications are pinned after the apps pinned manually by the user (green triangle)
Configuration steps
The following steps describe how to configure the taskbar pinned applications using policy settings:
Create the XML file. You can start with the XML example
Edit the XML file to meet your requirements and save it
Deploy the XML file to devices using configuration service provider (CSP), provisioning packages (PPKG), or group policy (GPO)
Important: If you use a provisioning package or import-startlayout to configure the taskbar, your configuration will be reapplied each time the explorer.exe process restarts. If your configuration pins an app and the user then unpins that app, the user's change will be overwritten the next time the configuration is applied. To apply a taskbar configuration that allows users to make changes that will persist, apply your configuration by using CSP or GPO.
Note: If you use GPO and your configuration only contains a taskbar layout, the default Windows tile layout will be applied and cannot be changed by users. If you use GPO and your configuration includes taskbar and a full Start layout, users can only make changes to the taskbar. If you use Group Policy and your configuration includes taskbar and a partial Start layout, users can make changes to the taskbar and to tile groups not defined in the partial Start layout.
Here you can find an example of taskbar layout that you can use as a reference:
<?xml version="1.0" encoding="utf-8"?><LayoutModificationTemplatexmlns="http://schemas.microsoft.com/Start/2014/LayoutModification"xmlns:defaultlayout="http://schemas.microsoft.com/Start/2014/FullDefaultLayout"xmlns:start="http://schemas.microsoft.com/Start/2014/StartLayout"xmlns:taskbar="http://schemas.microsoft.com/Start/2014/TaskbarLayout"Version="1"><CustomTaskbarLayoutCollection><defaultlayout:TaskbarLayout><taskbar:TaskbarPinList><!-- your pins list goes here --></defaultlayout:TaskbarLayout></CustomTaskbarLayoutCollection></LayoutModificationTemplate>
Sample taskbar configuration added to Start layout XML file
If you configure the Start layout using policy settings, you can modify the existing XML file by adding the taskbar customizations to it. Here's an example of a Start layout XML file that includes the CustomTaskbarLayoutCollection node.
<LayoutModificationTemplatexmlns:defaultlayout="http://schemas.microsoft.com/Start/2014/FullDefaultLayout"xmlns:start="http://schemas.microsoft.com/Start/2014/StartLayout"Version="1"xmlns="http://schemas.microsoft.com/Start/2014/LayoutModification"><LayoutOptionsStartTileGroupCellWidth="6" /><DefaultLayoutOverride><StartLayoutCollection><defaultlayout:StartLayoutGroupCellWidth="6"><start:GroupName=""><!-- your Start layout goes here --></start:Group></defaultlayout:StartLayout></StartLayoutCollection></DefaultLayoutOverride><CustomTaskbarLayoutCollection><defaultlayout:TaskbarLayout><taskbar:TaskbarPinList><!-- your pins list goes here --></taskbar:TaskbarPinList></defaultlayout:TaskbarLayout></CustomTaskbarLayoutCollection></LayoutModificationTemplate>
Modify the configuration file
Caution: When you make changes to the XML file, be aware that the XML format must adhere to an XML schema definition (XSD).
You can change the apps pinned to the taskbar by modifying the <TaskbarLayout> node.
In the <taskbar:TaskbarPinList> node, add (or remove) the apps you want pinned. You can pin Universal Windows Platform (UWP) apps and desktop apps:
<taskbar:UWA>: Select this option for UWP apps. Add the AUMID of the UWP app
<taskbar:DesktopApp>: Select this option for desktop apps. Add the Desktop Application ID or the Desktop Application Link Path of the desktop app
In the <CustomTaskbarLayoutCollection> node, the apps you add are pinned after the default apps. If you want to remove the default apps, and only show the apps you add in the XML file, then add PinListPlacement="Replace":
<CustomTaskbarLayoutCollection>: Keeps the default pinned apps. After the default apps, the apps you add are pinned
<CustomTaskbarLayoutCollection PinListPlacement="Replace">: Unpins the default apps. Only the apps you add are pinned. If you want to remove some of the default pinned apps, then add PinListPlacement="Replace". When you add your apps to <taskbar:TaskbarPinList>, include the default apps you still want pinned
In the <defaultlayout:TaskbarLayout> node, use region=" | " to use different taskbar configurations based on the device locale and region
Save the file
For practical examples of how to add, remove, or replace pinned apps, see the following sections:
The <CustomTaskbarLayoutCollection> section appends the listed apps to the taskbar by default. The following sample keeps the default apps pinned and adds pins for Paint, Microsoft Reader, and a command prompt.
To replace all default pins and add your own pins, add PinListPlacement="Replace" to <CustomTaskbarLayoutCollection>. Then, add the pins that you want to TaskbarPinList.
If the <TaskbarPinList> node has region matching the one configured on the device, then the configuration applies
If the <TaskbarPinList> node doesn't have a region matching the one configured on the device, then the first <TaskbarPinList> node without region applies
The following instructions provide details about how to configure your devices. Select the option that best suits your needs.
To configure a device with group policy, use the Local Group Policy Editor. To configure multiple devices joined to Active Directory, create or edit a group policy object (GPO) and use one of the following settings:
Group policy path
Group policy setting
Value
Computer Configuration > Administrative Templates > Start Menu and Taskbar
Start Layout
Path to the XML file
User Configuration > Administrative Templates > Start Menu and Taskbar
The GPO applies the Start and taskbar layout at the next user sign-in. Each time the user signs in, the timestamp of the .xml file with the Start and taskbar layout is checked and if a newer version of the file is available, the settings in the latest version of the file are applied.
User experience
After the taskbar layout is applied, the users must sign out and sign in again to see the new layout. Unless prohibited via policy settings, users can pin more apps, change the order, and unpin apps from the taskbar.
OS install and upgrade experience
On a clean install of Windows, if you apply a taskbar layout, the following apps are pinned to the taskbar:
Any default apps you don't remove
Apps that you specifically pin in the XML file
On a Windows OS upgrade, apps are already pinned to the taskbar. The taskbar layout applies the following logic:
If users pinned apps to the taskbar, then those pinned apps remain. New apps are pinned after the existing user-pinned apps
If the apps are pinned during the install or by a policy (not by a user), and the apps aren't pinned in an updated layout file, then the apps are unpinned
If a user didn't pin an app, and the same app is pinned in the updated layout file, then the app is pinned after any existing pinned apps
New apps in updated layout file are pinned after the user's pinned apps
If you apply the taskbar configuration to a clean install or an update, users can still:
Run the Creation Tool. When prompted for which media to use, select "USB flash drive", then select the flash drive to use.
After the bootable USB drive has been created, close the Media Creation Tool.
Open the USB drive inside File Explorer. You will see the "setup.exe" file, along with a few other files and folders. Take the autounattended.xml file you downloaded earlier and drag & drop it on the root level of the flash drive.
That's it. Take the USB drive and plug it in to whatever machine you want to install Windows on, turn on the PC and boot from the USB drive. Everything else will be taken care of.
Choose "Free" (or Licensed, if you have a license, and enter your license code). Click OK.
Add your ISO that you downloaded earlier.
You'll see your ISO loaded in.
Right-click on your loaded ISO file and select "New edit".
With your cache'd copy loaded, select the version of Windows to create (e.g. "Pro")
Right-click on the selected version, and click Load
Be sure to only decompress the version you want to edit. Don't have the program decompress all versions (this will take a LONG time)
With the image decompressed and loaded, you will notice the once grey circle next to your selection is now green, and the status is "Loaded". Additionally, you will notice there are several options down the left hand column. This is where you make your edits to the ISO.
Begin customizing your ISO.
For example, under updates, you can get the latest updates that are available but are not already a part of this ISO file. Go to Add>Latest online updates, and you will get a list of all available updates that you can add to the ISO. Check all or some of the updates listed and they will then be installed along with all other updates during the Windows installation.
Select "Enqueue" (or "Download" if you have a paid License)
Under the "Drivers" tab, you can add whatever additional drivers you may want, such as print or display drivers.
If you have any Registry files you want to add (e.g. any .reg files), you would do that in the Registry tab.
Removing Components (debloating) can be dangerous. Be careful of what you remove.
Generally speaking, the safest place to debloat Windows is under Windows Apps>Apps.
Expanding this will show you the list of apps that Windows installs by default. Uncheck the ones you dont want.
Scrolling down, you'll find "System Apps". There is one app we definitely dont want; "Content Delivery Manager". Removing this will remove the "ghost" apps that come on modern Windows systems, such as TikTok, Netflix, Twitter, etc. These apps arent actually installed, per-say, but if you click on the shortcut that has been placed there (by the Content Delivery Manager), it will go ahead and install that app.
Note: Removing the Content Delivery Manager will disable the changing login screens, so your login background will no longer change every couple of days.
If you're not a gamer (or just dont want it), uncheck the Xbox Game UI as well. Its mostly useless if you're not playing games on your PC.
Adjust (or don't) Scheduled Tasks to your needs
Features is somewhat similar to Apps, but instead of specifically removing things, here you adjust what features should and shouldn't be active on install.
Settings is an important tab as this tab lets us decide how Windows should be configured.
For example, under "Desktop", there are several settings that can be changed. Go through each setting and adjust to your needs (specifically under Privacy)
Adjust Services and Extra Services to your needs.
The Unattended tab is going to create an autounattended.xml file for installation. Automatically create a local user, disable Microsoft Accounts, set the computer name, etc. Select "Enable" at the top left, then go through here and set to your needs.
The Post-Setup tab is where you can install additional apps, such as Chrome, Firefox, VLC Player, etc., alongside the Windows installation.
In order to add apps, you need the "bundle" installer, which is normally found in an .msi file, although some .exe files have them as well. A "web" download will not work. It must be a full installer.
To install an app, download the bundle (examples below) and extract the .zip file. Next, go to Add>File, choose the bundle installer, and press OK.
Note: The Parameters are important! Like you see here, Chrome has the /passive flag on it, which allows it to install silently.
All apps must have some variant of this to perform a silent install. If you do not have the correct parameters for a silent install for whichever app you're trying to install, your Windows install will be stuck at this screen:
For the examples below (Chrome, Firefox, and VLC Player), here are the parameters needed. Chrome: /passive VLC: /S Firefox: /S
Note: For additional apps, you will need to find the full installer and whatever the silent install parameters are in order to have them run with the Windows install.
The Apply tab is where you create the ISO file
Check the "Create ISO" checkbox and tell NTLite where to save the ISO file. NTLite will also ask for a label to place on the ISO, so give it a label as well.
And the final step, click the green button at the top that says "Process".
Note: Windows Defender will sometimes catch a false positive on this tool at this point. To avoid this, go in to Windows Defender and disable Real-Time Protection. Once the ISO is created, re-enable Real-Time Protection.
If you are using the free version, you will receive a prompt after everything has been downloaded and the app is ready to create the ISO.
Depending on your choices when creating the custom ISO, you may see the prompt several times. Simply click OK to continue.
Note: A paid version will not have these prompts.
IMPORTANT!! Always test your ISO in a virtual environment before deploying to bare metal.
“It has been too long since this machine last replicated with the named source machine. The time between replications with this source has exceeded the tombstone lifetime. Replication has been stopped with this source.”
The above message can be seen in the AD DS section of Server Manager on a DC that has been off for a long period of time. It means that it’s lost its relationship with the other DCs because it may have old/outdated objects. Below are steps you can take to try and resolve this issue: Check to see if the broken DC holds any FSMO rights FSMO rights are domain roles that are held by domain controllers, we need to check if the broken DC holds any of these roles so we can take them away prior to restoring replication
On the working DC run the following in an elevated CMD windownetdom query fsmo
Check if the broken DC appears under any of the printed roles, if it does not proceed to ‘Check for lingering objects’.
If it does, proceed to the next step. See image below of an example where the broken server held the RIP pool manager role (in this case it is server ‘06’)
In a new elevated CMD window, type the following commands in succession:
ntdsutil
roles
connections
connect to server currentserver.mydomain.suffix
quit
You now have to enter which role you wish to seize off the broken DC, based off the results from the command ran earlier enter one or more of the following:
Seize domain naming master
Seize infrastructure master
Seize PDC
Seize RID master
Seize schema master
Once done you will get a trail of different text, some saying failed - don’t worry, this is expected. Once it has all done, click CTRL + C to back out of thentdsutilprompt, leave the CMD window open for reference just incase
Return to your original elevated CMD window and re-run the netdom query command to see if all roles are now held by the working DC. See below image to show the process and the final check to see it has worked
You can use the Microsoft Lingering Object Liquidator (or LOL for short) to scan and remove any lingering objects that remain on the outdated DC (link below)
Once downloaded, run the application on the problem DC and click ‘Detect AD Topology’
Select the correct naming context for the domain, normally the auto-selected one should be fine
The reference DC is a working DC you know has the most up-to-date AD, and what should be looked at when seeing if there are any lingering objects
The target DC is the subject to see if they have any lingering objects (the problem DC)
You can then ‘Detect lingering objects’ and delete if any arise
Allow the working DC to replicate with the outdated DC
Now that you have removed any lingering objects, you are ready to allow AD replication to begin again, there are a few steps to get this working
On the DC that you are confident is working and happy, run the following command in an elevated CMD window, you are looking for error 8614 (the tombstone error saying that you cannot replicate with the problem DC)
repadmin /showrepl
Once you’ve verified that this DC is the one showing that error message, you are ready to implement a reg-key that tells the working DC “yes, you are allowed to replicate with a problem DC” (because we have eliminated all lingering objects)
The reg key is to be created in the following location: HKLM\SYSTEM\CurrentControlSet\Services\NTDS\Parameters
Create a new REG_DWORD (32-bit) named ‘Allow replication with divergent and corrupt partner’ with a value of 1
Force replication between the two DCs
On the working DC run the following command, take heed of the bolded sections that will need to be amended to incorporate your local environment:
‘brokenDC’ is referencing the DC that is currently outdated
‘workingDC’ is the DC you’d like to replicate from
‘mydomain’ is the first part of your domain suffix
‘suffix’ is the latter part of your domain suffix (could be local/com/etc)
You should hopefully see that replication has been successful, to verify try run the command again without the ‘/force’ switch to see if it works still
Check on the broken (hopefully working now) DC to see if replication has worked and any users/groups you know that weren’t there prior have now appeared, if you don’t know of any, create a test user on the working DC, replicate again and check to see if it appears
Final steps (cleanup)
Return to the registry key you created and change the value from 1 to 0, there are no longer any tombstoned DCs so this is no longer an issue
Delete any test users/groups you created to check to see whether replication was now working
That should be it! I hope this has been helpful for at least one person - if it has let me know, I’d love to hear. If you notice anything about my process that could be improved, also please let me know.
1. Follow the Windows 11 install process until you get to the Sign in screen.
2. Hit Shift + F10. A command prompt appears.
3. Enter start ms-cxh:localonlyat the command prompt.
A "Create a user for this PC" dialog window appears.
4. Enter a local username and password. If you enter no password, you'll have no password.
5. Complete the installation process and you'll be using the local account you created.
For Windows 11 Builds older than Build 26120
Unplug any ethernet cable that is connected. During setup, press Shift + F10 At the command prompt, type: oobe\bypassnro and press enter. The computer will reboot. After the computer reboots, press Shift + F10 again to open the command prompt window again. Type ipconfig /release and press enter. This will release any internet connection you may have. Close the command prompt window. Go through the setup process as you normally would. When you reach the step where you would connect to WiFi, choose "I dont have internet..." Create your local account and complete the setup process.
Author: James Bye Last update: 2026-02-08 23:20
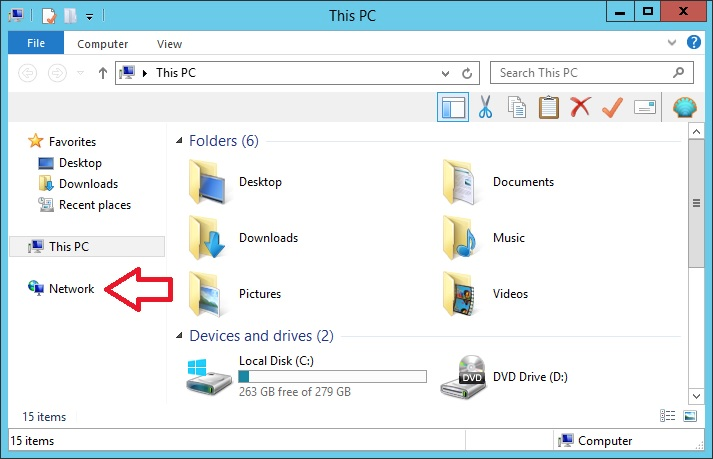
Remove Network Icon from File Explorer Navigation Pane via Group Policy
How to disable the Network icon from the left side of the File Explorer navigation pane on a PER USER basis using Group Policy.
Create a new GPO and name it appropriately. Edit the GPO and navigate to: User Configuration > Preferences > Windows Settings > Registry Right-click in the open space, choose Registry > New > Registry-Item
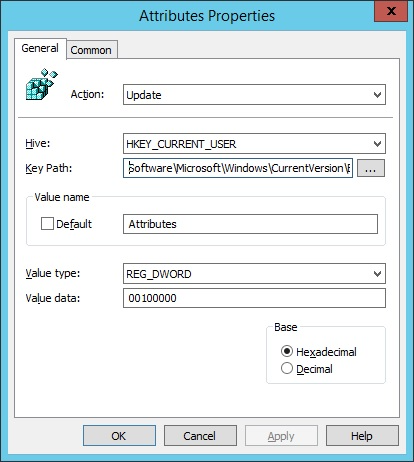
Apply the following properties:
Action: Update
Hive: HKEY_CURRENT_USER
Key Path: Software\Microsoft\Windows\CurrentVersion\Explorer\CLSID\{F02C1A0D-BE21-4350-88B0-7367FC96EF3C}\ShellFolder
Value name: Attributes
Value type: REG_DWORD
Value data: 00100000
Base: Hexadecimal
Prevent users from installing software (local group policy)
1. In the taskbar, search for Edit group policy and open it.
2. Expand "Administrative Templates "--"Windows Components"--"Windows Installer", find" Turn off Windows Installer" on the right, double-click on it, Select Enabled and click Ok to save.
3. Go back to the main menu in the Policy Editor window, and navigate to User Configuration > Administrative Templates > System. In the right-hand window, scroll down until you find Don't Run Specified Windows Applications. As the title implies, this is used for blocking certain programs from being run, but we can also use it to block the Windows Installer.
4. Double-click that and another window appears. When you click Enabled, a new option appears called List of Disallowed Applications. Click Show and a third window appears, where you type in the path of the program to be blocked.
You have to lay out the route to the location of the Windows Installer, so the Policy Editor can find it. The Windows Installer Program is called msiexec.exe and is located at C:\Windows\System32\msiexec.exe
This will directly prohibit standard users from installing applications on the device.
Prevent users from installing software (domain group policy)
DisableUserInstalls is a machine policy which will block per-user installations. There is also an option for "hiding" existing per-user installed applications in favor of the per-computer installed versions.
To configure:
Open gpmc.msc, select the GPO to which you will add the policy.
Navigate Computer Configuration, Policies, Administrative Templates, Windows Components, Windows Installer.
Set the policy "Prohibit User Install" to "Enabled".
Set "User Install Behavior" to "Hide User Installs".
Set the policy "Turn off Windows Installer" to "Enabled"
Domain rename is intended to be a supported method for renaming domains when domain renames are necessary. It is not intended to make domain rename a routine operation.The domain rename process is complex, and it requires a great deal of care in planning and execution. In addition, the time that is required for a complete domain rename operation is directly proportional to the size of an Active Directory forest in terms of its number of domains, domain controllers, and member computers. Therefore, although domain rename is possible, it should not be undertaken lightly.The domain rename operation is not supported in Microsoft Exchange Server 2007 or Exchange Server 2010. DNS domain rename is supported in Exchange Server 2003. However, renaming of the NetBIOS domain name is not supported in any version of Exchange Server. Other non-Microsoft applications might also not support domain rename.
For this time easy Guide, I will show you all how to rename domain name in Windows Server 2016, the process is straightforward. but as usual. backup any necessary information and Server before you proceed & I always advice, please do this exercises in LAB Environment (Hyper-V). Don’t simply take any risk by doing this is production environment unless you have to.
Additionally, make sure you have a local PC administrator account active on each client workstation. This is a guaranteed way to log in to the client machine should it not pick up any new info from the server after the rename.
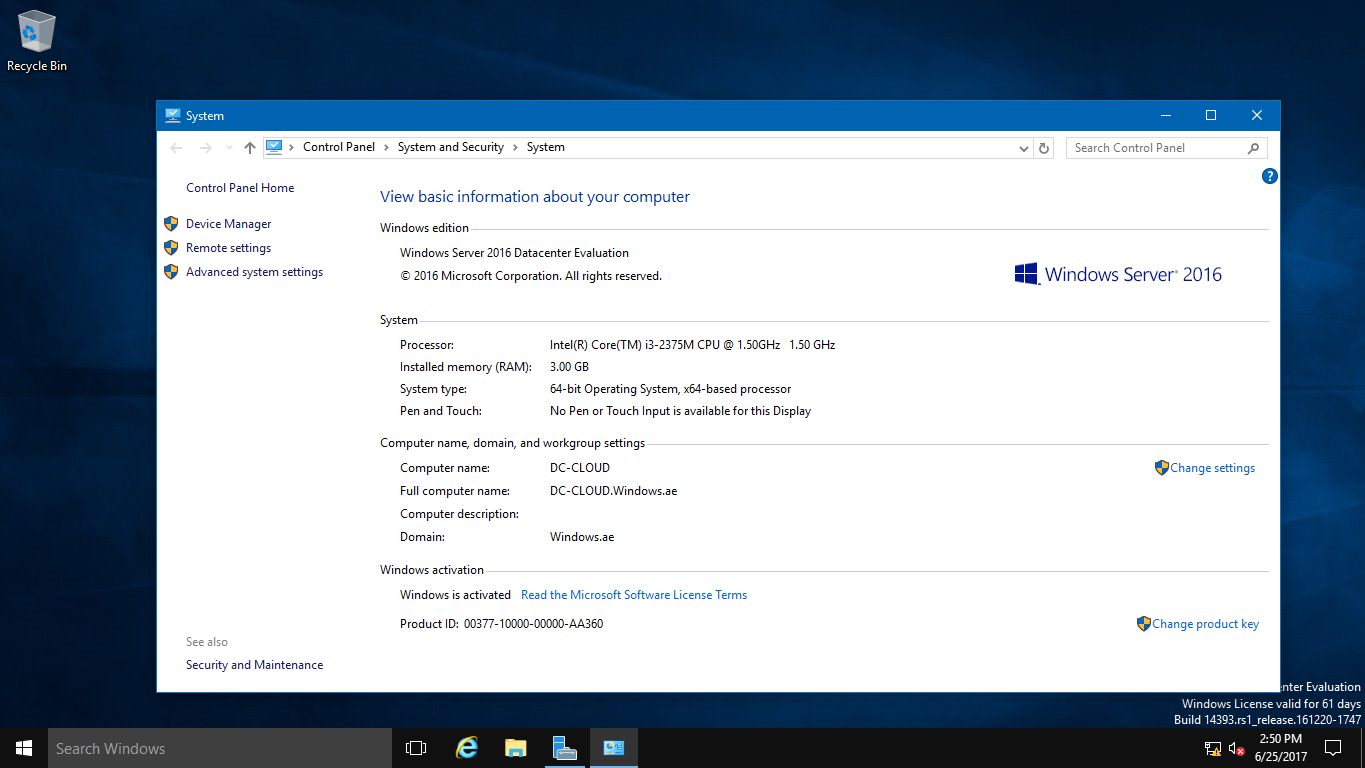
The existing domain is Windows.ae and I will rename it to Sifad.local
So, let get started.
1 – Open your System Properties and check your existing domain name. As you can see from my Windows Server 2016 system properties, the existing domain name is Windows.ae. This will be changed to Sifad.local in the short while.
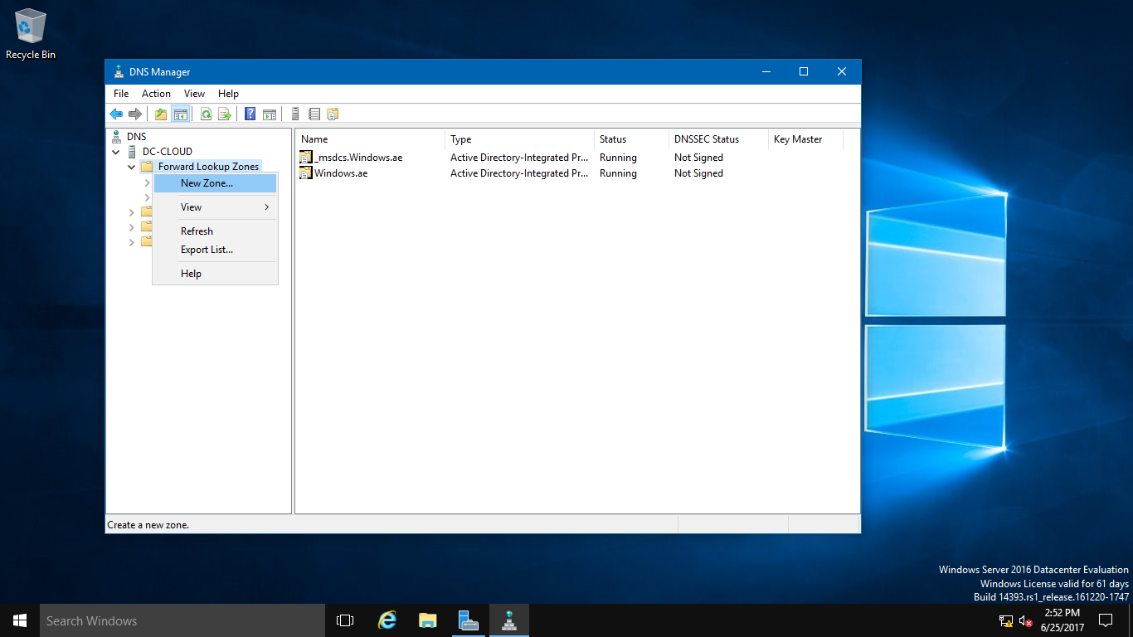
2 – Next, open your Server Manager, go to Tools & click DNS to open DNS Manager.
3 – In the DNS Manager, create the New DNS Zone (Sifad.local). This is to make sure that after whole process is successful, member servers and Windows clients can join to new the Domain name.
To create new DNS Zone, Right Click Forward Lookup Zone, and click New Zone.
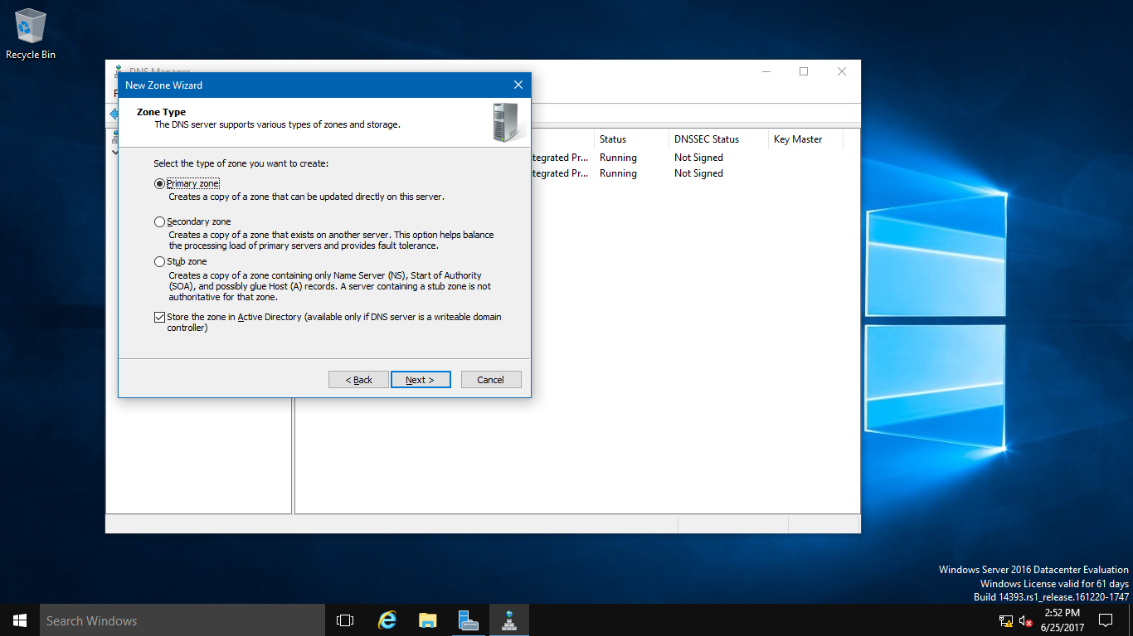
4 – On the Welcome to the New Zone Wizard, just click Next button.
5 – On the Zone Type, Click Primary Zone and click Next.
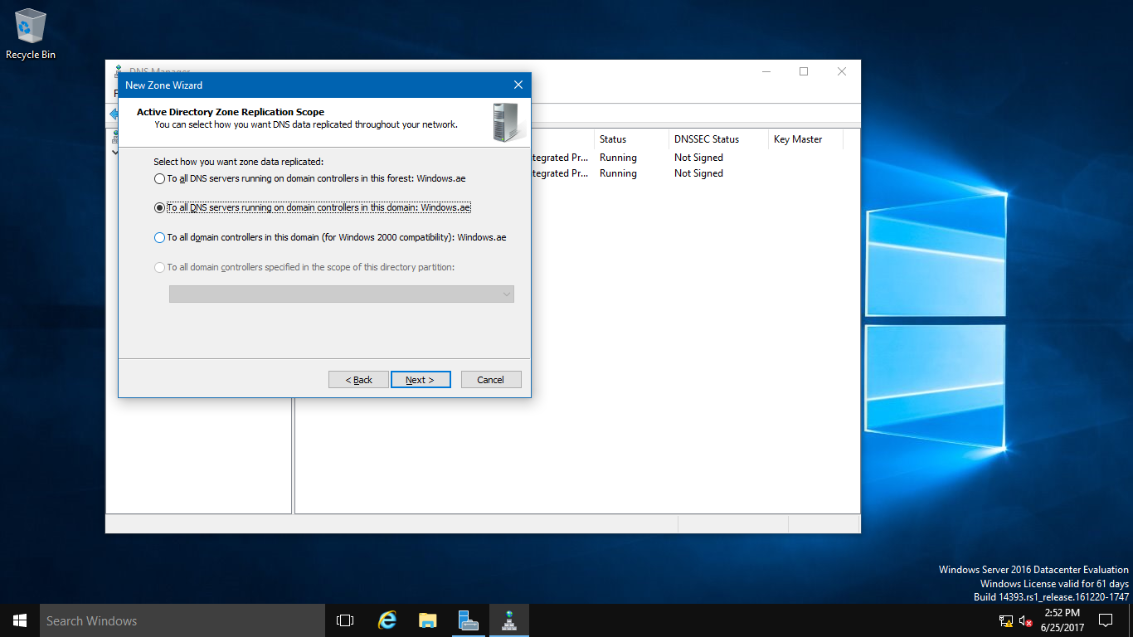
6 – On the Active Directory Zone Replication Scope, click the radio button "To all DNS servers running on domain controllers in this domain: Windows.ae" and click Next.
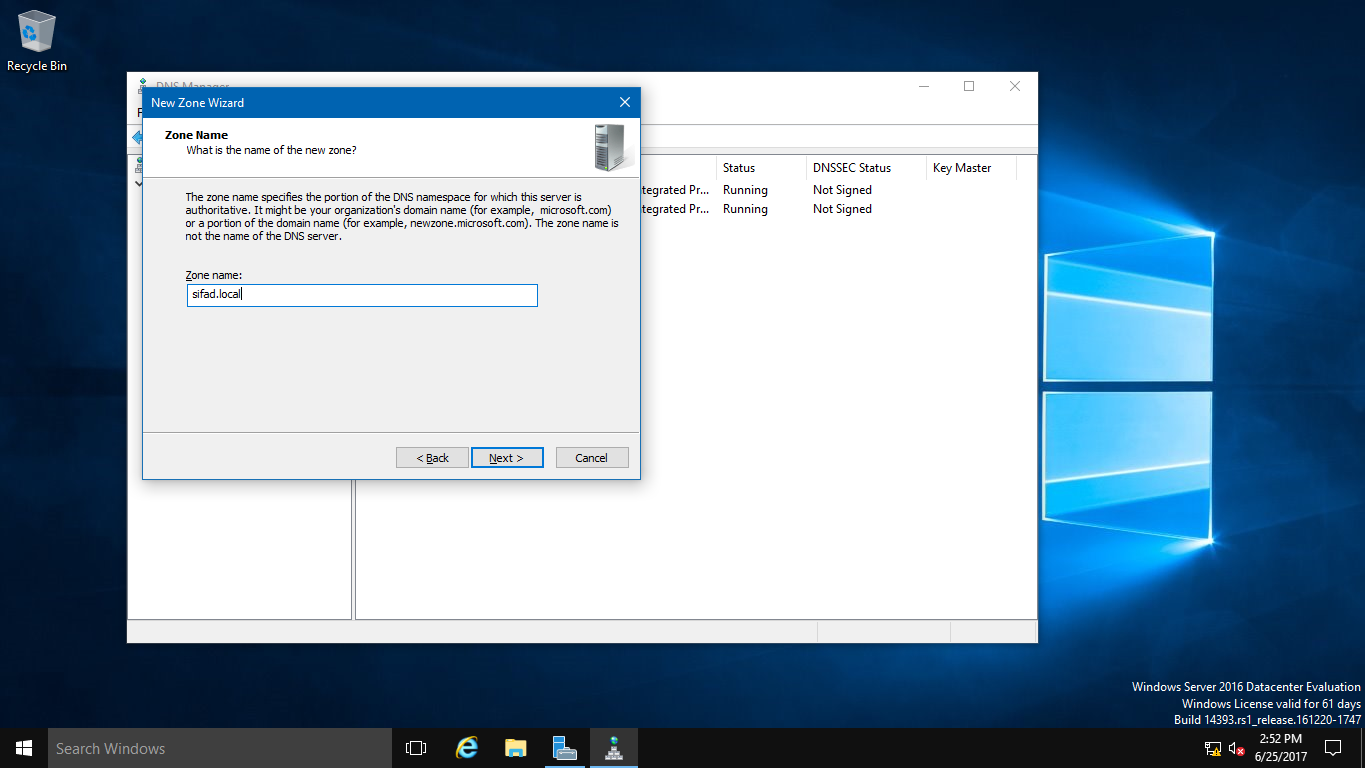
7 – In the Zone Name, enter the New Domain Name. In this case, the new domain name is Sifad.local.
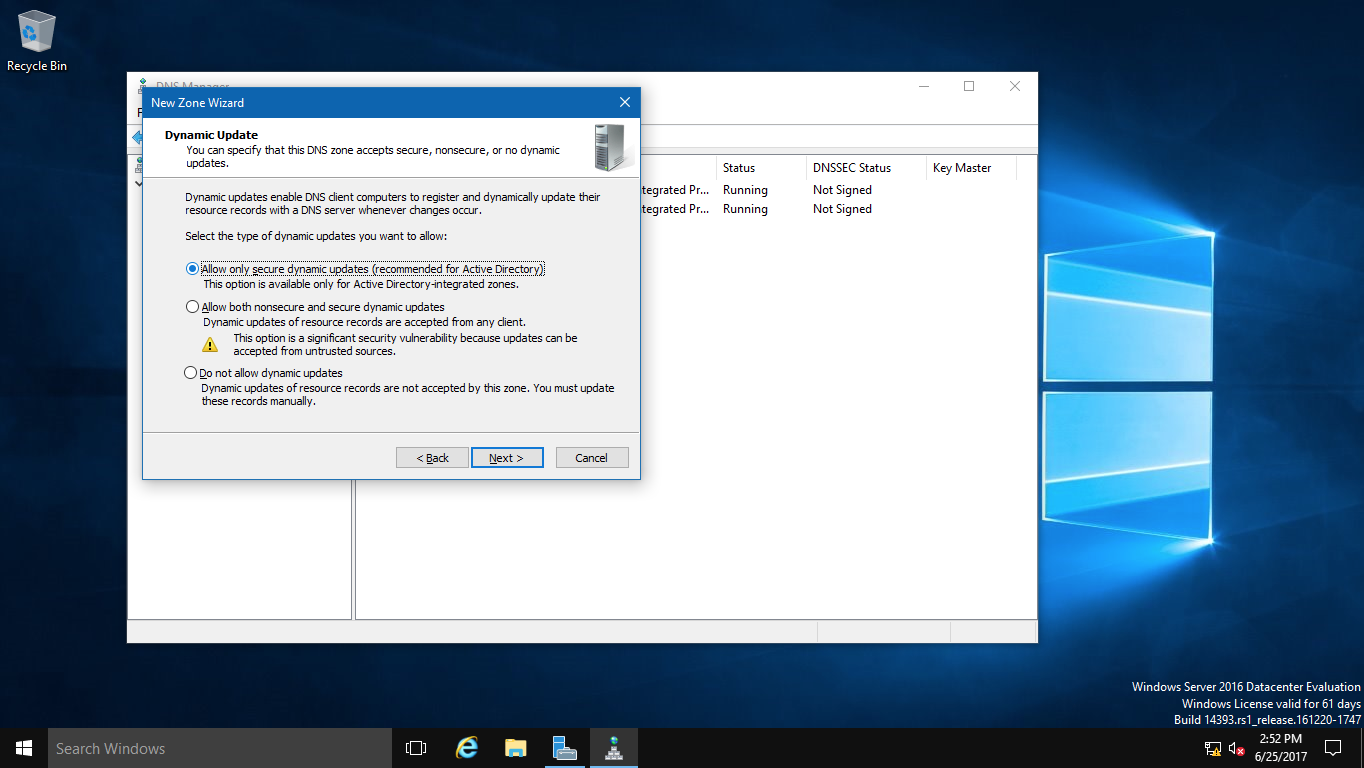
8 – On the Dynamic Update, click Allow only secure dynamic updates (recommended for Active Directory), and click Next.
9 – On the Completing the New Zone Wizard, click Finish to complete the process.
10 – In DNS Manager, you can see the new domain name is listed (sifad.local).
11 – Next, open Command Prompt as administrator.
12 – In cmd, type rendom /list and press enter – this command use to generate a state file named Domainlist.xml. This file contains the current forest configuration.
13 – Next, open a File Explorer and browse to C:\Users\Administrator. Here you will find the Domainlist.xml file.
14 – Once you see the Domainlist.xml file, right click the file & choose Edit. This is where we will change the DNSname and NetBiosName.
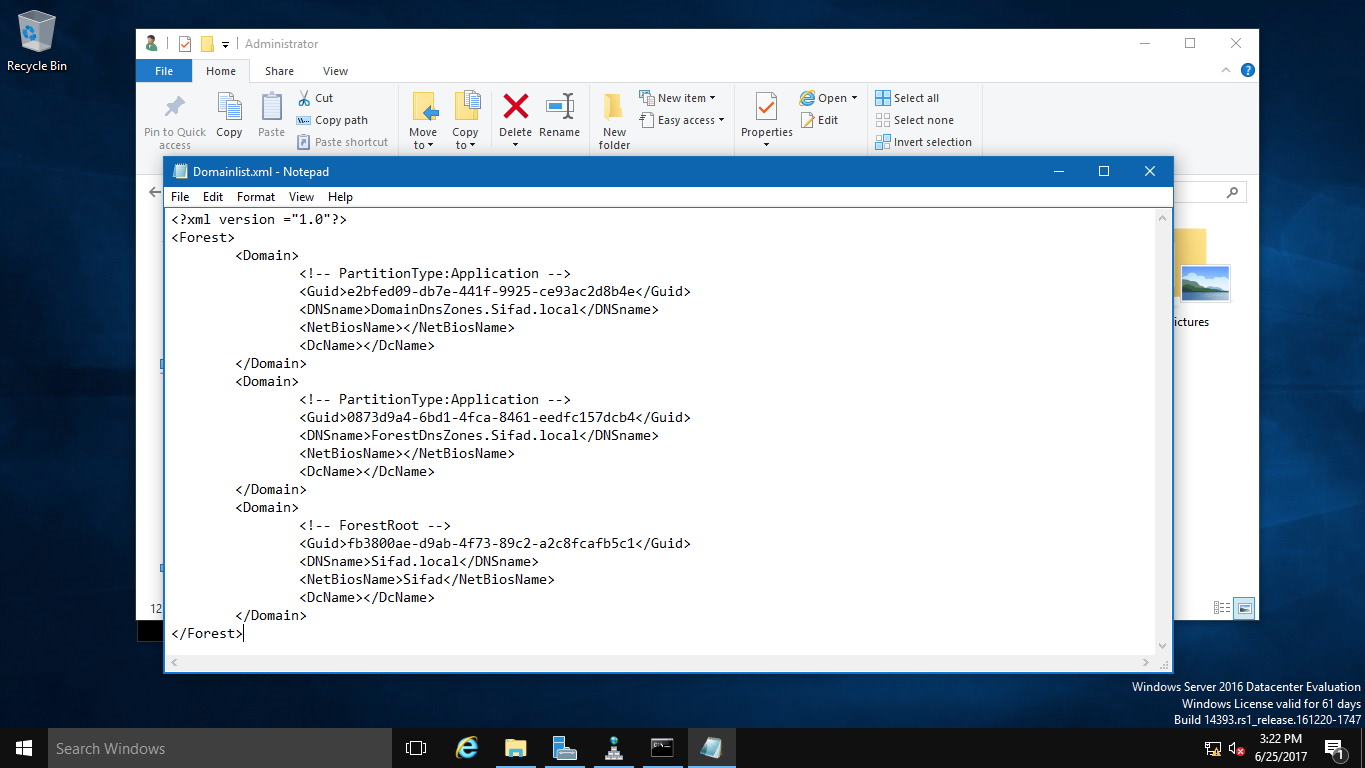
15 – With the Domainlist.xml open, you can see the existing domain name.Change this existing domain name to new domain name.
16 – After the file is changed to the new domain name, make sure you save the Domainlist.xml file.
17 – Back in cmd, type rendom /showforest. This is to show the potential changes. This step does not make any changes.
18 – Next, type rendom /upload. This is to upload the rename instructions (Domainlist.xml) to the configuration directory partition on the domain controller holding the domain naming operations master role.
19 – Next, type rendom /prepare. This is to verify the readiness of each DC in the forest to carry out the rename instructions. This should contact all DC’s and return no errors before proceed to next process.
20 – Next, type rendom /execute. This is to verify readiness of all DC’s and then preforms the rename action on each one.
NOTE: There will be a service interruption during this process. Once the process is successful, your server will be restarted.
21 – Once the DC has restarted, log in using the new domain name as Administrator.
22 – Next, open System Properties andcheck to see the old domain name is gone, replaced by new domain name.
23 – Back in cmd, type gpfixup /olddns:windows.ae /newdns:sifad.local
This is to refresh all intra domain references and links to group policy objects.
24 – Next, type gpfixup /oldnb:DC-CLOUD /newnb:sifad. Replace DC-CLOUD with the hostname of the server.
25 – Next, type rendom /clean. This is to remove references of the old domain name from AD.
26 – Next, type rendom /end. This is to unfreeze the forest configuration and allow further changes. This was frozen during the rendom /upload step.
27 – Next, open DNS Manager and click the newly created domain (Sifad.local). You should see the server IP listed but we still need to make sure this DNS Zone is working with client machines.
28 – Next, turn on your client PC. Open System Properties and join to new domain (sifad.local). Windows Security box will show up. Enter the new domain administrator and domain password and click OK.
29 – After the client PC restarts, log in as a domain administrator.
30 – Once you log in, double check the System Properties. Now your client should have successfully joined the new domain (Sifad.local).
31 – Now, go to the server andopen DNS Manager. You should now see the client is listed in DNS. You can also check in Active Directory Users & Computers that client now also listed.
This ends the rename process and we now have a DC with a new domain name.
Author: James Bye Last update: 2025-04-04 19:44
Rebuild/Fix a corrupted user profile
In case your user profile gets corrupted, here are the steps to create a new one.
Add a new user account and configure it as an administrator. For detailed steps, see the article Manage user accounts in Windows
Sign in with the newly created account and copy the files from the corrupted profile:
Open your User folder by selecting Start , typing file explorer into the Search box, and selecting File Explorer in the list of results.
Select This PC, then select the hard drive that Windows is installed on (it's usually your C: drive), then the Users folder, then the folder with the name of your account.
Locate the C:\Users\<Old_Username> folder, where C is the drive that Windows is installed on and Old_Username is the name of the profile you want to copy files from.
Right-click on the <Old_Username> folder and select Rename.
Ranem the folder to <Old_Username>.old or <Old_Username>.bak
Open Registry Editor (regedit) and navigate to: HKEY_LOCAL_MACHINE\SOFTWARE\Microsoft\Windows NT\CurrentVersion\ProfileList.
Locate the folder (SID) starting with S-1-5 that matches the old, corrupted profile by checking the ProfileImagePath value.
Delete that SID folder.
Log out of the admin account and log in to the user account. It will be rebuilt at this time.
Once logged in, open File Explorer and navigate to the C:\Users\ folder, where C is the drive that Windows is installed on.
Locate the <Old_Username_.old folder and double-click on it.
Select all of the files and folders in this folder, then select the Edit menu and select Copy.
Locate the C:\Users\<New_Username> folder, where C is the drive that Windows is installed on and New_Username is the name of the newly created user profile folder.
Select the Edit menu and select Paste. Overwrite all files if/when prompted.
Set Logon Message via Group Policy (local or domain)
Open GPMC: Open the Group Policy Management Console (gpmc.msc).
Create/Edit GPO: Right-click your domain or an Organizational Unit (OU) and select "Create a GPO in this domain, and Link it here".
Navigate to Policy: Go to Computer Configuration > Policies > Windows Settings > Security Settings > Local Policies > Security Options.
Configure Title: Double-click Interactive logon: Message title for users attempting to log on. Enable "Define this policy setting" and enter a title (e.g., "Warning").
Configure Text: Double-click Interactive logon: Message text for users attempting to log on. Enter your disclaimer or message.
Update Policy: On client machines, run gpupdate /force in CMD to apply immediately
Fixed Assets: Warning: "Please exit application before installing. Product is running..."
If you receive this warning message when trying to install Fixed Assets CS, complete the following steps before installing again.
Verify that all users are out of the program.
Navigate to X:\WinCSI\DEPRSYS\UID, where X represents the drive where the application is installed.
Delete any files in this folder.
The files in the UID folder are user lock files. When the program closes normally, these files are automatically deleted. If the program closes unexpectedly, the user locks can remain even if the user is not in the program.
Offline Mode lets you access CS Professional Suite desktop applications without an internet connection. Features that require an active internet connection (like web-based integrations, CS Connect, e-filing) are not available in offline mode.
To use offline mode, you need to either:
- Pair your desktop application with an app like Auth0 Guardian for offline access.
Important:
For UltraTax CS, this option is only available beginning in 2024.
You can only have 1 app paired with Offline Mode at a time.
- Have another member of your firm generate a temporary password to use within 15 minutes.
- Contact Support and have them generate a temporary password to use within 15 minutes.
Set up offline mode
Option 1: Pair your device with an authenticator app
Open your application and sign in.
In the application, go to:
In Accounting CS or Workpapers CS, select Help then Activate Mobile Authenticator
In UltraTax CS, Fixed Assets CS, or FileCabinet CS, select Help then Repair, open the Misc. tab and select Mobile Authenticator
Follow the on-screen messaging to pair an authenticator app like Auth0 Guardian to your device. You'll add a new account to your app and use either a QR code or setup key to create the connection.
Enter the code generated by your authenticator in the field.
Select Activate when you finish pairing
Option 2: Have another staff member generate a temporary password for you
In the application, go to
Temporary Password for Offline Mode to generate a temporary password.
In Accounting CS, Workpapers CS, or Practice CS, go to Help then Generate Offline Temporary Password
In UltraTax CS or FileCabinet CS, go to Help then Repair, open the Misc. tab and select Generate Temp Password
Select Generate Temporary Password
Select Copy
Provide the password to another staff member of your firm.
Note:
The temporary password expires after 15 minutes.
Option 3: Have support generate a temporary password.
Contact the TR Support team to receive a temporary password.
Note:
The temporary password expires after 15 minutes.
Use offline mode with the paired app or temporary password
Without an active internet connection, open a CS Professional Suite desktop application.
At the Something Went Wrong page, select Work Offline..
Enter the authentication code that was provided by the authentication app or the password that was provided by your colleague or support.
One or more of the Thomson Reuters programs continues to run the desktop setup when trying to launch the program. Some programs will run successfully after running the setup, others continue the setup loop.
Solution:
Run the desktop setup and check for any errors.
ex. "A newer version of this product is already installed." from the Thomson Reuters Authenticator Browser Handler application.
Check the install log for the error and its following action (likely a silent failure).
Uninstall the program causing the failure (i.e. Thomson Reuters Authenticator Browser Handler)
Run the applications desktop setup
This should fix the setup loop.
Author: James Bye Last update: 2026-06-01 19:14
pfSense
Upgrade pfSense from old versions (when the GUI says no update available)
Warning: WireGuard was removed from the base system in releases after pfSense Plus 21.02-p1 and pfSense CE 2.5.0, when it was removed from FreeBSD.
If upgrading from a version that has WireGuard active, the upgrade will abort until all WireGuard tunnels are removed. For more details, see the Release Notes
WireGuard is available as an add-on package on pfSense Plus 21.05, pfSense CE 2.5.2, and later versions. The settings for the WireGuard add-on package are not compatible with the older base system configuration.
Note: The WireGuard package is still under active development. Follow the development progress on the developer’s YouTube channel
The built-in relayd load balancer has been deprecated and removed as it does not compile or run on pfSense 2.5.0. A copy of the load balancer configuration will be left in /conf/deprecated_load_balancer.xml for reference when converting to an alternate solution, such as HAProxy (HAProxy package).
PHP was migrated from PHP 7.2 to PHP 7.4. A number of PHP errors were fixed along the way but certain combinations of configuration parameters may result in further errors. Note any problems on the Netgate Forum, and if possible, try to include relevant portions of config.xml with personal data removed.
Due to the significant nature of the changes in this version of pfSense software, warnings and error messages, particularly from PHP and package updates, are likely to occur during the upgrade process. These errors are primarily seen on the console as the upgrade is applied, but may appear in a crash report once the upgrade completes. In nearly all cases these errors are a harmless side effect of the changes between FreeBSD 11.2 and 12.x and between PHP 7.2 and PHP 7.4.
See the FreeBSD 12 Release Notes for information on deprecated hardware drivers that may impact firewalls upgrading to pfSense version 2.5.0. Some of these were renamed or folded into other drivers, others have been removed, and more are slated for removal in FreeBSD 13 in the future.
OpenSSL was upgraded to 1.1.1a as a part of upgrading to FreeBSD 12.0, this will impact all packages which depend on OpenSSL, especially those not obtained from Netgate. Be aware that this will require obtaining new versions of such packages after the upgrade.
Upgrading to pfSense software version 2.4.5-p1 requires pfSense-upgrade version 0.70 or later. Most installations will automatically pick up the new version and upgrade normally. If this does not happen automatically and the upgrade to version 2.4.5-p1 is not offered, use the following procedure:
Navigate to System > Updates
Set Branch to Previous stable version
Wait a few moments for the upgrade check to complete
Optional: Confirm that the latest version of pfSense-upgrade is present (version >= 0.70) using pkg-staticinfo-xpfSense-upgrade.
If the correct version is not present, wait a bit longer and check again as that package may be updating in the background.
Set Branch to Latest stable version
Wait a few moments for the upgrade check to complete
At this point, the upgrade check should see 2.4.5-p1 and the upgrade can proceed.
pfSense software version 2.4.5-p1 includes pkg version 1.13.x which introduces a new metadata version. Most installations will automatically pick up the new version and upgrade normally. In certain cases, especially coming from much older versions, the pkg utility may require a manual update before it can correctly process the new metadata.
The pkg utility can be upgraded manually with the following command run from an ssh or console shell:
Third party packages from alternate repositories are causing problems for users with the upgrade process and also with post-upgrade behavior. These packages have never been supported, and had to be manually added by users outside of the GUI.
Due to the major changes required for FreeBSD 11.2 and PHP 7.2, third party packages from alternate repositories cannot be present during the upgrade. There is no way to predict if a third party package supports the new version or will cause the upgrade itself to fail.
The upgrade process will automatically remove pfSense-pkg-* packages installed from alternate repositories. After the upgrade completes, the user can reinstall these packages. Packages from alternate repositories will not appear in the Installed Packages list in the GUI, and must be entirely managed in the command line.
This change does not affect packages installed from the official pfSense package repository.
Using the AutoConfigBackup Service is integrated into pfSense version 2.4.4 and free for all to use. It is no longer an add-on package. It is now located under Services > Auto Config Backup.
PHP was migrated from PHP 5.6 to PHP 7.2. A number of PHP errors were fixed along the way but certain combinations of configuration parameters may result in further errors. Note any problems on the Netgate Forum or the pfSense subreddit, and if possible, try to include relevant portions of config.xml with personal data removed.
Due to the significant nature of the changes in this version of pfSense software, warnings and error messages, particularly from PHP and package updates, are likely to occur during the upgrade process. These errors are primarily seen on the console as the upgrade is applied, but may appear in a crash report once the upgrade completes. In nearly all cases these errors are a harmless side effect of the changes between FreeBSD 11.1 and 11.2 and between PHP 5.6 and PHP 7.2.
Gateway handling changes in 2.4.4 may result in different default gateway behavior than previous releases. Nearly all cases should behave properly, but be aware that it may be necessary to re-select the default gateway after upgrade.
The FEC LAGG Protocol is deprecated and its options have been removed #8734
The login protection daemon was changed from sshlockout_pf to sshguard and the behavior may be more sensitive in some cases to SSH and GUI login failures. For example, be aware of possible issues where probes from monitoring systems may end up triggering a block.
Major changes to RADIUS for the base system and specifically Captive Portal could lead to behavior changes in certain cases. Read the release notes and associated bug reports for more details. Note any problems on the Netgate Forum or the pfSense subreddit.
A crash report containing no data (empty) may appear after the upgrade completes. See #8915
Intel Atom systems containing HD Graphics chipsets may experience console problems after the update. Affected systems will boot successfully, but fail to display console output after the boot menu. To fix the problem, add the following line as a Loader Tunable to use the syscons console type:
kern.vty=sc
Alternately, try using i915 driver with the standard VT console using these lines as Loader Tunables:
i915kms_load="YES"drm.i915.enable_unsupported=1
Warning
This driver will consume extra bus resources and may cause resource hungry add-on hardware to fail, such as multi-port network adapters.
Systems with similar console problems not containing a graphics chip supported by the i915 driver may need to reinstall 2.4.4 to use a UEFI console.
An ISP that supplies a bogus interface MTU via DHCP may cause interface problems with certain network interface types when Advanced Configuration options are present on DHCP interfaces, such as a DHCP WAN. The typical default case is handled automatically, but advanced options override the corrected default behavior. To fix the problem, apply the patch from #8507 or add supersedeinterface-mtu0 to the Option modifiers box in the WAN interface advanced DHCP options. If a custom dhclient.conf is in use, add supersedeinterface-mtu0 on a line inside the interface block. See #8507. The Advanced Configuration case has been corrected for the next release.
To use ZFS, a reinstall of the operating system is required. It is not possible to upgrade in-place from UFS to ZFS at this time.
Wireless interfaces must be created on the Wireless tab under Interfaces > Assignments before they are available for assignment
Some hardware devices may not boot 2.4.0 installation images, for example, due to UEFI compatibility changes. These are primarily BIOS issues and not issues with the installer images. Upgrading in place from 2.3.x typically allows affected hardware to run version 2.4.
To upgrade Firewalls in place which are running pfSense software version 2.2.x or earlier, first upgrade the firewall to pfSense 2.3.4 and then perform an update to pfSense 2.4.x afterward. Alternately, reinstall 2.4.x directly and restore the configuration.
Warning: When upgrading to 2.4.x from 2.2.x or earlier, remove all packages before attempting the update. Even when upgrading from 2.3.x this is the best practice to ensure a smooth upgrade process. Package settings are retained.
Versions of pfSense software prior to 2.3 used a different upgrade method. For “full” installations, a tgz file was used by the firewall to copy in the new files. This method was problematic and is no longer used.
The best practice in these cases is to take a backup and reinstall with a current, supported version of pfSense software.
The following information is for upgrading from outdated and unsupported versions of pfSense software. They may still be of use to users attempting to upgrade from an older release to a current, supported, release.
When upgrading from a very old release, read every document below that covers versions between the older one being upgraded and the new version.
Setting up web filtering for your home or business does not need to be an expensive or cumbersome ordeal. Using free, open-source tools, we can set up web filtering for an entire network using pfBlockerNG and pfSense, a free, open-source router/firewall OS. This will work for most systems and browsers, but there are a few caveats I’ll talk about at the end of the guide.
1. Requirements
pfSense already setup and operating as your primary firewall/DNS server
Basic understanding of pfSense
URL filtering lists
10 minutes
Here is our simple network:
WAN:10.100.10.9LAN: 192.168.1.1/24
We have a simple WAN/LAB setup. Four endpoints on the 192.168.1.1 network and a single pfSense Firewall/Router at the edge. The pfSense box is handling all our DHCP and DNS requests.
This guide can be applied to any type of network setup. However, the critical requirements are that your DNS queries are going to pfSense and that traffic is routed through pfSense in order to reach the internet. (More on this later...)
Simple pfSense setup
Notice I have an external DNS server setup on the pfSense box itself at 10.100.100.100. We are going to make sure that the only way to reach that DNS server, or any other DNS server is through this pfSense box.
2. Installing PfBlocker
The first step is to install the pfBlockerNG plugin on your pfSense instance.
Click Available Packages and find and Install pfBlockerNG(Note the development version)
3. Set up Your Firewall Rules
Because we are using DNS based filtering, we need to ensure that DNS queries are always answered by pfSense. Anyone who knows the basics about networking on Windows, Linux, or Mac knows how easy it is to change your DNS settings and point to whatever DNS server you want.
In order to prevent this, we are going to BLOCK all DNS requests that go anywhere besides pfSense. These rules are going to be set up on our simple LAN network, but can be done for all your different networks/subnets just as easily.
First, we need to make an ALLOW/PASS rule to allow DNS requests to our pfSense server. Under Firewall > Rules add a new rule:
Rule Information:
Action: Pass
Interface: LAN
Protocol: UDP
Source: Any
Destination: Single host or alias - 192.168.1.1
Destination Port Range:From - DNS, To - DNS
Description: Allow internal DNS requests
NOTE: Make sure to hit Save
Next, we will make a DENY/BLOCK rule that blocks ALL DNS requests going anywhere.
Rule Information:
Action: Block
Interface: LAN
Protocol: UDP
Source: Any
Destination: Any
Destination Port Range:From - DNS, To - DNS
Description: Block all other DNS
NOTE: Make sure to hit Save
Your policy should at least include these two rules rules for Port 53 (Ignore the Anti-Lockout Rule):
Your Allow rule to your pfsense internal interface must come BEFORE the BLOCK rules for all remaining DNS traffic.
This ruleset will block any DNS traffic going anywhere besides pfSense. This will make changing the DNS servers on an endpoint a useless endeavor as the DNS traffic will not reach any DNS server.
4. Setup pfBlockerNG
Next, were going to setup pfBlockerNG.
First, lets go to the pfBlockerNG settings. Go to Firewall > pfBlockerNG
First thing we're going to do is enable pfBlockerNG and remember to hit Save on the bottom.
Next, we are going to go to the DNSBL section in pfBlockerNG.
Here is where we can set up DNS blocking for our entire network.
First thing we want to do is Enable DNSBL.
The next step is to determine what our DNSBL Virtual IP is going to be. The DNSBL Virtual IP is where all the domains on your block lists get redirected so that the domain does not reach the end user.
This should be an address in the private address space. For example, in my network, my subnet is on 192.168.1.0/24. I decided to just use 172.16.16.16 as I don’t plan on ever using that network.
Use whichever virtual IP you want or copy mine, but just make sure to hit save on the bottom!
5. Adding DNSBL Feeds
Now we need to add some URL/Domain feeds to pfBlockerNG for our DNS Blocklist. Getting URLs is very easy and free. There are tons of free resources online with constantly updated feeds of URLs/domains.
You can choose as little or as many categories as you want.
Within DNSBL, go to DNSBL Feeds and hit Add.
In this guide, we are going to block all Gambling and Drug related domains. Start by filling out the DNS GROUP Name and Description.
DNS GROUP Name: Drugs and Gambling
Description: List of drugs and gambling domains
Next, we need to start adding DNS Block Lists. Using one or more of the websites above, we can add as many lists as we want to this DNS Group. In this case, I am going to some URLs for lists of Drugs and Gambling domains.
Hit More Info (Or select List if you are doing multiple lists, the URLs will appear on the top)
Copy and paste the download Link.
Add the link to your DNSBL Feed entries. Hit Add if you need to add more than one.
Make sure each header/label is unique. You can call them whatever you want. You can see I have two different lists for Gambling.
Important: In order to block the domains, you need to set the List Action to Unbound.
Update Frequency - I set mine to once a day. There’s no reason to overload servers and hit it multiple times a day. I think once a day is fine.
Here are the settings summarized:
DNS GROUP Name: Drugs and Gambling
Description: List of drugs and gambling domains
DNSBL: Add your links, Format - Auto, State - ON
List Action: Unbound
Update Frequency: Once a Day
Hit save.
You should now see your DNS group(s) in your DNSBL Feeds. Make sure to hit save.
6. Updating Your DNS List
Next, we need to update the DNS List in pfBlockerNG so that we can start filtering.
In pfBlockerNG, hit Update and then hit Run and you should see your lists update.
That’s it! You can see on the pfSense homepage a new dashboard module for pfBlocker.
7. Let’s Test!
Using the command prompt on a windows machine, doing an ipconfig shows our DNS server is 192.168.1.1, which is the IP address of our pfSense box.
Let's see what happens when we try to go on some gambling or drug sites:
As you can see, visiting any domain on our block lists causes a 1x1 pixel to be returned to the end user. Regular sites continue to work as normal, but banned sites on the list resolve to a blank pixel in a web browser.
Remember we made those DNS BLOCK rules earlier? Let's see what happens when a user tries to go around them by changing the DNS settings on their endpoint:
As you can see, performing an nslookup on command prompt at external DNS servers does not yield any results. This is because we've blocked ALL DNS queries besides to the pfSense box.
8. Exceptions
This is not a foolproof method for web filtering. Some browsers, such as Mozilla Firefox, use DNS-over-HTTPS by default, which renders this system useless. This prevents pfSense, or any DNS service in general, to be controlled and filtered because the DNS queries are happening over an encrypted HTTPS connection. Firefox sets up their DNS-over-HTTPS with Cloudflare.
Additionally, this will not prevent someone reaching a blocked website by IP address. If someone wanted to get around this, they could lookup the IP for the desired site and reach directly instead of using DNS.
# Inform the user about the authentication process
Clear-Host
Write-Host @"
** ATTENTION **
You will be asked to authenticate four times - for Azure AD, AIP, Exchange Online, and the MSOnline services. This is to ensure you are properly connected to all services, confirming all available functions within this script will work as intended.
If you are missing any of the required modules, they will be automoatically installed on to your computer.
"@
$confirmation = Read-Host "Do you understand the above statements and wish to proceed? (y/n)"
if ($confirmation -ne 'y' -and $confirmation -ne 'yes') {
Write-Host "Operation cancelled."
exit
}
# Check if AzureAD module is installed, if not, install it
if (-not (Get-Module -Name AzureAD -ListAvailable)) {
First, check to see the vss_snap_individual: trueis set in the agent.yaml file.
1.Open Notepad or Notepad++ as Administrator and go to File> Open, then navigate to C: > ProgramData > Lockhart.
2.Once at Lockhart, in the bottom right hand corner switch from "Text documents" to "All files" to see the agent.yaml and open it
3.backup: vss_snap_individual: true **If the backup: section already exists, only add the new line beneath it
vss_snap_individual: true, and make sure it's spaced to be in line with "bld". (screenshot attached)
4.Save the change.
5.Restart the Lockhart service.
6.Validate the service remains running after restarting. If it doesn't stay running the config entry may have been done incorrectly.
7.Make sure your policy is set to include all Volumes desired if applicable.
8.Wait about 2 minutes, and the start a new backup. Typically this failure happens immediately, but after the fix is in place, the backup should progress/complete.
*When this is set, future backups will use the previous method of getting snapshots on a per-volume basis
If the error persists after making this change, this means the shadows are unbound. First, gather info about the vssadmin using the following commands:
vssadmin list shadowstorage vssadmin list providers vssadmin list writers
Then, in order to fix the unbound shadows, we need to resize the shadow storage using the follow command:
We need to do this for all images, the /For= is accompanied by the disk in the "For Volume" while the /On= is the "Shadow Copy Storage Volume". Refer to the previous information commands for this.
This command is used to manage how much disk space Windows allocates for Shadow Copies (System Restore points and previous versions of files). Here is the breakdown of the syntax: vssadmin Resize ShadowStorage /For=C: /On=C: /Maxsize=20%
Command Breakdown
·vssadmin
·The command-line utility for the Volume Shadow Copy Service. It manages the backups and snapshots of your drives.
·Resize ShadowStorage
·The specific operation telling Windows to change the current limits of the storage area used for shadow copies.
·/For=C:
·Specifies the drive for which you are adjusting the storage (the source). In this case, the C: drive.
·/On=C:
·Specifies the drive where the actual shadow copy data will be physically stored (the destination). Usually, this is the same as the source drive.
·/Maxsize=20%
·Sets the maximum limit. Using 20% is the standard with Ninja.